> For the complete documentation index, see [llms.txt](https://helpcenter.xopero.com/xopero-one-en/llms.txt). Markdown versions of documentation pages are available by appending `.md` to page URLs; this page is available as [Markdown](https://helpcenter.xopero.com/xopero-one-en/deployment-and-configuration/xopero-one-agent/installation-on-linux-and-macos.md).
# Installation on Linux & MacOS
{% tabs %}
{% tab title="Linux" %}
## Prerequisites
Prior to agent installation, check if your system is meets all the requirements.
{% content-ref url="/pages/sWnNuc32ePz2p4zZ0Rdz" %}
[System requirements](/xopero-one-en/xopero-one/system-requirements.md)
{% endcontent-ref %}
{% content-ref url="/pages/ZO1Ci3C1rUavK5WvO4ld" %}
[Supported platforms](/xopero-one-en/xopero-one/supported-platforms.md)
{% endcontent-ref %}
***
## Installation
1. Download the **agent** installer (bash script) to your **Linux** system and grant execute permission to the file owner (user or group) using the following `chmod` command:
{% hint style="info" %}
To download the agent installer, login to **Xopero ONE Management Service** using a web browser, then go to **Settings** > **Advanced** > **Workers** and click **Download agent** button. The **Download agent** window will open — click the appropriate agent version to download it.
{% endhint %}
```bash
chmod +x xoperoclient.sh
```
2. Next, run the script using the following command:
```bash
./xoperoclient.sh or bash xoperoclient.sh
```
Running the script along with sudo command
{% hint style="warning" %}
The above script should be initiated using an account with administrative privileges — because of that it might be required to use the **`sudo`** command simultaneously (as in the above example).
{% endhint %}
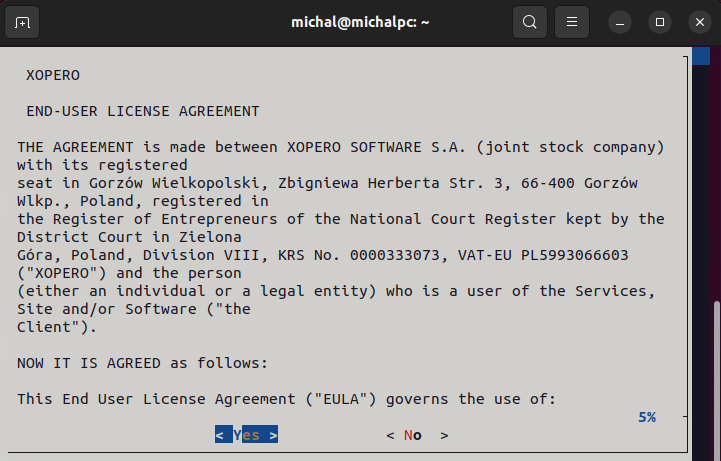
3. Accept the **END-USER LICENSE AGREEMENT** to proceed.
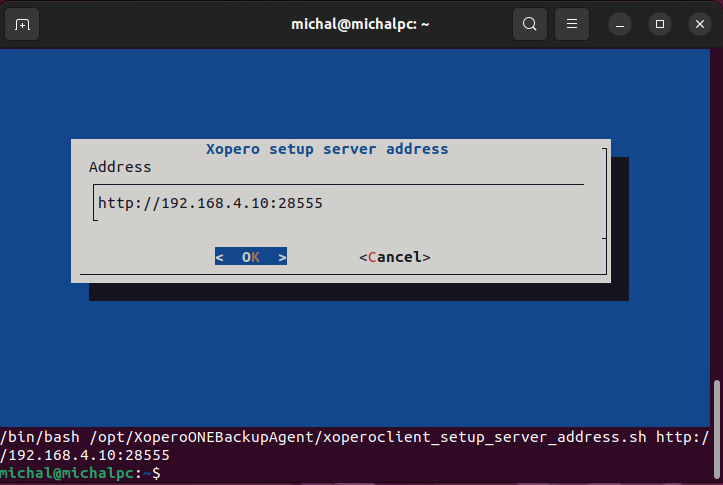
4. Next, enter the IP address in the **Address** field (including the protocol and port) and click **OK** to finish the installation. Your address can be found in **Xopero ONE Management Service** — the system will display it once you start downloading the **agent** installer.
5. Now that **Xopero ONE agent** is installed, you can activate it in the **Xopero ONE Management Service** (**XMS**) web panel and start protecting your data.
{% endtab %}
{% tab title="MacOS" %}
## Installation
1. Download **Xopero ONE agent** installation wizard via XMS[^1] and run it.
{% hint style="info" %}
To download the **agent** installer, login to **Xopero ONE Management Service** using a web browser, then go to **Settings** > **Advanced** > **Workers** and click **Download agent** button. The **Download agent** window will open — click the appropriate **agent** version to download it.
{% endhint %}
2. Click **Continue** to proceed.
3. Select **Continue** in the **Read Me** section.
4. Read the **END-USER LICENSE AGREEMENT** and hit **Continue** to accept it.
5. Hit **Agree** to accept the terms of the software license agreement.
6. Change the installation directory if needed and click **Install** to begin the installation.
7. During the installation process, the creator will ask you for the address of your XMS[^1]— define it in this step.
8. Click **OK** to confirm your configuration.
9. The **Xopero ONE** agent has been successfully installed— you can close the installation wizard.
***
## Unattended installation
If you don't want to use the installation wizard, you can choose the unattended installation option.
1. Download the `xoperoclient.pkg` file to your device.
{% hint style="info" %}
To download the **agent** installer, login to **Xopero ONE Management Service** using a web browser, then go to **Settings** > **Advanced** > **Workers** and click **Download agent** button. The **Download agent** window will open — click the appropriate **agent** version to download it.
{% endhint %}
2. Run the following command in **macOS** terminal (**Applications** > **Utilities** > **Terminal**):
{% code overflow="wrap" %}
```bash
sudo /bin/launchctl setenv "XOPERO_INSTALLER_SERVER_ADDRESS_CONFIG" "https://XMS_adress::28555>" && sudo installer -pkg -target /; sudo /bin/launchctl unsetenv "XOPERO_INSTALLER_SERVER_ADDRESS_CONFIG"
```
{% endcode %}
> **‼️Command overview:**
>
> {% code title="Setting the environment variable with your Xopero ONE Management Service IP address and default port" overflow="wrap" %}
>
> ```bash
> sudo /bin/launchctl setenv "XOPERO_INSTALLER_SERVER_ADDRESS_CONFIG" "https://"
> ```
>
> {% endcode %}
>
> {% code title="Launching the installer" overflow="wrap" %}
>
> ```bash
> sudo installer -pkg -target /;
> ```
>
> {% endcode %}
>
> {% code title="Removing environment variables" overflow="wrap" %}
>
> ```bash
> sudo /bin/launchctl unsetenv "XOPERO_INSTALLER_SERVER_ADDRESS_CONFIG"
> ```
>
> {% endcode %}
***
## Permissions configuration
After installation, in a few steps you need to add the necessary permissions for the **Xopero** file.
1. Click on the **Mac** icon in the upper left corner and select **System Preferences...** from the drop-down menu.
2. Next, go to **Security & Privacy**.
3. Navigate to the **Privacy** tab, then select **Full Disk Access** from the menu on the left.
4. Add **Xopero.Device.App.app** to the list.
5. Grant access to **Xopero.Device.App.app** to finish the configuration.
{% endtab %}
{% endtabs %}
To learn how to activate the agent in the Xopero management console, check the *Useful links and items* section.
## Useful links and items
{% content-ref url="/pages/sUUV69SpYVc3DM8CFnms" %}
[Agent configuration](/xopero-one-en/deployment-and-configuration/xopero-one-agent/agent-configuration.md)
{% endcontent-ref %}
[^1]: Xopero ONE Management Service