This article explains how to access and use the Device details panel.
Device details panel
You can open the Device details panel to view additional information for any device— simply click the info button in the right-top corner of the device tile (in device view) or next to the listed device (in the list view).
Device status
In device details, you can view additional information about the device and its backup status:
Device health — displays the result of the latest backup and the associated device logs.
Storage usage — shows the amount of compressed and original data, as well as the used space compared to the total available storage.
Backup plans details — displays the assigned backup plan and its next scheduled run time. Also allows manual initiation of the backup process.
Device details also provide backup and restore statistics for the current day, the previous day, the last 7 days, 14 days, and 30 days. They are marked in three different colors: green for OK,yellow for Warning, and red for Error.
In the Recent notifications section, you can view the three latest backup statuses, including a brief description, the time they occurred, and the notification type.
✅ Success — the backup or operation completed successfully.
ℹ Info — informational message about the backup or system status.
⚠️ Warning — indicates a potential issue that may require attention.
❗ Error — the backup or operation failed and requires immediate action.
Delete all device backups — removes all backups associated with the device.
Device details — displays complete hardware information for the device.
All properties — provides detailed properties (useful for troubleshooting).
Set as default — marks the device as the default one.
Statistics for backup and restore
Notification types include:
Device groups and additional options
At the bottom of the panel, you can view the groups the device is assigned to, the agent version, and access several useful options:
Device health, storage usage, and backup plans stats in XMS.
Example of device statistics tile.
Additional options at the bottom of Device details panel.
Device removal
This article explains how to delete a device, with or without retaining its data.
There are cases in which you may need to delete a device from the Xopero ONE platform— it can be useful for quickly removing all data associated with a device from your storage, or for freeing up a license used by a device that no longer requires protection.
To delete the device from Xopero ONE platform:
1
Open the Devices tab, switch to the list view, and select the checkbox next to the device or devices you want to delete.
2
The system will display additional options in the top bar, including the Delete button. Click it to remove the selected device.
3
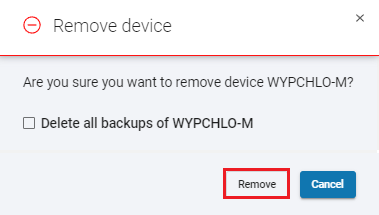
The application will ask you to confirm your action— you can choose to delete all backups associated with the device or keep them. To remove the device with all backups, select Delete all backups of DEVICE NAME checkbox and click Remove to proceed. If you wish to remove only the device, leave the checkbox unchecked and click Remove to proceed.
4
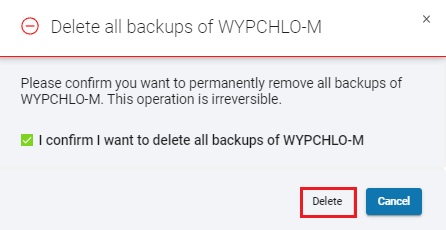
If you choose to delete all backups along with the device, the system will ask you to confirm your decision. Select I confirm I want to delete all backups of DEVICE NAME checkbox and click Delete to proceed.
5
Once the operation is complete, the system will display a success message confirming that the device has been deactivated. You can monitor the progress of the data removal process in the Tasks tab.
6
If you choose to delete only the device, there will be no additional confirmation— you will instantly see the success message confirming that the device has been deactivated. The progress of the device data removal process can be viewed in the Tasks tab.
7
The device removal process is complete. You can now use the freed license to add another device to the Xopero ONE platform.
List view
This article provides information about statistics and details available in the list view.
General information
List view shows all devices with Xopero agents installed and provides detailed information about their backups, system status, and device properties. It also lets you view and manage device groups, as the Groups menu is available only in the list view (you won't see it in the default view).
If the Groups menu does not appear in the list view, select one or more devices to make it visible.
List view table
To change the categories in the device list table, click the ⚙ gear button in the top-right corner.
In the list view table, you can see device details, including:
Device type — the operating system installed on the device.
Device name — the name assigned to the device.
Device status — the current device connection status (Online, Offline, Unauthorized).
Backup status — the result of the latest backup.
Group — the groups to which the device is assigned.
Last backup — the time of the most recent backup.
Next backup — the scheduled time for the next backup.
IP address — the device’s network IP address.
Description — additional information or notes about the device.
Operating system — the version and type of OS installed on the device.
Agent version — the version of the Xopero agent installed on the device.
Last successful backup — the time when the last backup completed successfully.
In the list view, you also have several additional options available. Each device has these options in its corresponding row of the device table:
Advanced search engine — allows you to search for devices by filtering them by name, type, group, availability, and status. The Advanced search option provides additional filters, including operating system, next backup time, and IP address range, enabling precise targeting and efficient device management.
Filters — you can change the categories in the device list table.
List of plans — displays backup plans assigned to the device.
Restore — allows you to instantly restore your backup data.
Device details — opens the device details panel.
Additional options
Example of the device list table categories.
Advanced search option in the advanced search engine.
This article provides information about statistics and details available in the device view.
Device view metrics
In the Devices tab of Xopero ONE Management Service (XMS), available in list view and device view, you can access various information about your protected machines.
The device view lists all devices with an active Xopero agent installed in separate tiles. Each tile is divided into multiple sections, providing detailed information about the device:
Device status — devices can have three statuses in the Xopero system:
Device backup status — displays the result of the latest backup and the associated device logs.
Most recent and next backup status — shows the completion time and status of the last backup, as well as the scheduled time for the next backup.
Device details — opens a side panel with detailed information about the device.
Assigned backup plans — displays a list of assigned backup plans, including their name, latest completion time, and result summary. Also allows manual initiation of the backup process.
Assign plan — allows you to assign a new backup plan to the device.
Restore and backup — allows you to instantly restore, or run a backup plan assigned to the device.
Overview
Learn the basics about Devices tab in Xopero ONE Management Service.
Viewing options
Only machines with the Xopero ONE agent installed are visible in the Devices tab.
In the Devices tab, devices can be displayed in two modes:
Device view — presents each device separately with detailed information about its last backups.
List view — optimized for managing a large number of devices; displays all devices in a table. In list view, you can configure column visibility, adjust the number of items per page, and view details such as group, IP address, description, agent version, operating system, and the time of the last successful backup.
Switching the view
The default view in Devices tab is the device view. To switch to the list view, click the switch icon in the top-right corner of the main window.
If you want to go back to the default view, simply click the switch icon again (the icon will look different, but it's in the same place).