Loading...
Loading...
Loading...
Loading...
Loading...
Loading...
Loading...
Loading...
Loading...
Loading...
Loading...
Loading...
Loading...
Loading...
Loading...
Loading...
Loading...
Loading...
Loading...
Loading...
Loading...
Loading...
Loading...
Loading...
Loading...
Loading...
Loading...
Loading...
Loading...
Loading...
Loading...
Loading...
Loading...
Loading...
Loading...
To back up virtual machines directly from the Hyper-V host, you need to run Windows Server 2016 or newer. Integration with older operating systems is not possible.
Xopero ONE supports both standalone hosts and hosts connected in clusters. In clustered environments, you must install a dedicated Hyper-V agent on each host.
When adding a Hyper-V cluster, you must use an administrator account.
Learn about virtual disk types that are excluded from backups due to hypervisor snapshot limitations, and how to protect them.
When performing a virtual machine backup (agentless), Xopero ONE relies on the hypervisor's snapshot mechanism to ensure data consistency. Certain disk types are architecturally excluded from snapshots by the hypervisor itself, which means they cannot be included in a standard VM-level backup.
The following disk modes do not support snapshots and cannot be backed up:
Pass-through disks — these disks are directly attached to the physical storage and are bypassed by the Hyper-V checkpoint (snapshot) mechanism.
If you need to protect data on pass-through disks, you can use the following method:
Install the Xopero ONE Backup&Recovery Agent directly within the virtual machine’s guest operating system.
Configure a file or image-level backup task with the installed agent.
By using an in-guest agent, Xopero ONE utilizes the internal VSS (Windows) or live-read (Linux) mechanisms to capture the data, effectively bypassing the hypervisor's snapshot limitations.
To integrate VMware hosts with Xopero ONE, you need an administrator account (root is not required). You can use an existing account, but best practice is to create a dedicated VMware user with admin privileges for backup and restore tasks.
Adding VMware hosts is just the first step.
To fully integrate the VMware environment, you can install a virtual appliance (VA) on the VMware host — this enables faster backups using advanced transport methods like HotAdd. Installing the VA is not required for faster backups — you can also use a storage area network (SAN), though this requires proper configuration and a SAN datastore.
If a vCenter server exists in your infrastructure, connect Xopero ONE to the vCenter server rather than an individual ESXi host. Connecting directly to an ESXi host when a vCenter server is present may cause issues.
Guide to VMware backup in Xopero ONE, covering available backup options, backup mechanisms, plan configuration, and scheduling.

Functionality and mechanisms of VMware backup plans in Xopero ONE.

Overview of VMware backup options and features in Xopero ONE, including useful tools, transport methods, and backup capacity settings.
Learn about virtual disk types that are excluded from backups due to hypervisor snapshot limitations, and how to protect them.
How to create a VMware backup plan.
Learn how to connect to a virtual machine's disk via VMware datastore.
Xopero ONE automatically retries connecting to the virtual machine's disk in the event of network disconnections, ensuring that backup tasks complete successfully. Administrators can enable direct disk access via VMware datastore to shorten the data transfer path, reduce network issues, and improve backup performance.
By default, the datastore access mode is disabled, and connections occur through the virtual machine. In on-premises deployment model, administrators can enable this mode globally by adding the following section to the Xopero ONE Management Service configuration (appsettings.json file):
Learn about virtual disk types that are excluded from backups due to hypervisor snapshot limitations, and how to protect them.
When performing a virtual machine backup (agentless), Xopero ONE relies on the hypervisor's snapshot mechanism to ensure data consistency. Certain disk types are architecturally excluded from snapshots by the hypervisor itself, which means they cannot be included in a standard VM-level backup.
The following disk modes do not support snapshots and cannot be backed up:
Independent persistent — changes are written immediately to the disk, but the disk does not participate in snapshots.
Independent non-persistent — changes are discarded when the VM is powered off or reset; these disks also do not support snapshots.
If you need to protect data on independent disks, you can use the following method:
Install the Xopero ONE Backup&Recovery Agent directly within the virtual machine’s guest operating system.
Configure a file or image-level backup task with the installed agent.
By using an in-guest agent, Xopero ONE utilizes the internal VSS (Windows) or live-read (Linux) mechanisms to capture the data, effectively bypassing the hypervisor's snapshot limitations.
Learn more about the VMware recovery process in Xopero ONE.
Xopero ONE offers several methods to restore virtual machines directly to VMware. Below you will find the available VM recovery methods for VMware environment — choose the option that best fits your needs.
This process involves restoring the machine’s configuration files to the VMware datastore, preparing a virtual machine, and mounting the disks to run directly from the storage. As a result, you can start your virtual machine within just a few minutes.
This method is not intended for production use. It serves as a disaster recovery feature. If you need to restore a virtual machine to VMware after a failure, run both the instant restore and whole VM recovery tasks simultaneously. This way, you can access the virtual machine within minutes using instant restore, and once the whole VM recovery task is completed, you can stop the instant restore process and switch to the fully restored, production-ready virtual machine.
The granular recovery feature allows you to restore individual files and folders from a VMware virtual machine backup. This makes the restoration process faster and more convenient in many unexpected situations. Using the iSCSI protocol, the Xopero ONE agent accesses files directly from the storage, enabling you to recover only the specific files you need without restoring unnecessary data.
This feature allows you to create a new virtual machine either in its original location or in a different one. It is the most traditional method of restoring a virtual machine — Xopero ONE restores the virtual machine data directly from the storage to the VMware datastore.
Learn more about Hyper-V recovery limitations in Xopero ONE.
Depending on the situation, Xopero ONE uses two restoration methods: one that provides higher accuracy and another that is less precise. The system automatically selects the appropriate method based on predefined criteria.
If the configuration version on the host where the restoration is taking place is lower than that of the VM being restored, a warning labeled DW9715 will appear. You can check the host’s configuration version using the following PowerShell command:
If the VM you backed up had the TPM (Trusted Platform Module) enabled, a warning labeled DW9717 will appear during restoration.
Several important settings cannot be restored using the less accurate method. These include:
CD/DVD drive controller settings.
Connect access settings.
Console support settings.
Disk QoS (quality of service).
Display settings.
EFI boot order settings.
Floppy drive settings.
Machine group memberships.
Resource measurement settings.
Hyper-V virtual machines restoration process overview.
When working with backup software, it’s important to know how to restore your data efficiently. Xopero ONE offers multiple methods to restore virtual machines directly to Hyper-V hosts — select one that best fits your requirements.
The instant restore feature quickly restores a VM’s configuration files to the Hyper-V host and prepares the virtual machine by mounting its disks directly from storage using the iSCSI protocol. This enables the VM to start within minutes. Because the data remains in the backup storage, no actual data is copied or restored elsewhere, allowing fast access without duplicating the backup.
To restore a virtual machine to Hyper-V after an incident, run both the instant restore and whole VM recovery tasks at the same time. This allows you to access and use the VM almost immediately via instant restore. Once the whole VM recovery is finished, you can stop the instant restore process and switch to using the fully recovered VM in production.
Whole VM recovery allows you to restore a virtual machine to its original location or to a new one. This is the standard method for VM restoration — Xopero ONE retrieves the VM data directly from storage and restores it to the Hyper-V host.
Instant restore is perfect for immediate disaster recovery, giving rapid access to your virtual machines within minutes.
Whole VM recovery ensures that your VM is fully restored and ready for production use.
Using both methods together allows you to quickly recover Hyper-V virtual machines while minimizing downtime.
In this article, you will learn more about the Hyper-V backup features.
In Xopero ONE, you can enable application-aware backups for Windows Server virtual machines, which allows you to create consistent backups. This functionality is based on Microsoft VSS (Volume Shadow Copy Service), which silences applications and suspends write requests for up to 60 seconds. VSS flushes the file system buffer and freezes the file system, ensuring that metadata is saved and data is written in a consistent order. You can also enable the Continue backup on errors option, which allows the backup to proceed even if application-aware issues occur.
Hyper-V RCT (Resilient Change Tracking) is a built-in feature of the Hyper-V architecture that tracks changes in the disk blocks of virtual machines. Similar to VMware’s Changed Block Tracking (CBT), it greatly improves the efficiency of data backup operations. RCT allows incremental and differential backups to run faster and more effectively by providing a direct list of changed blocks since the last backup, eliminating the need to compare current VM disk data with previous backup versions.
RCT works by maintaining a dedicated change tracking log for every virtual disk connected to a VM. This log keeps track of all disk blocks that have been modified since the last backup. When a backup starts, RCT supplies the backup software with a list of these changed blocks, allowing it to copy only the modified data. The tracking log is continuously updated after each backup, ensuring that future backup operations remain fast, incremental, and efficient.
Incremental backups — RCT is highly effective for incremental backups, as it identifies and captures only the data blocks that have changed since the last backup. This approach greatly reduces both the backup duration and storage consumption.
Differential backups — in case of differential backups, which include all changes made since the last full backup, RCT simplifies the process by directly identifying the modified blocks. This makes differential backups faster, more reliable, and easier to manage.
The skip disks feature in Hyper-V allows the backup process to omit certain disks from snapshot creation. This applies to disks where snapshots are not supported or practical, such as shared disks or physical disks directly attached to a virtual machine. By skipping these disks, Hyper-V ensures that the backup operation can continue smoothly without errors or interruptions, maintaining the overall stability and reliability of the backup process.
Skip disks feature highlights Xopero ONE’s adaptability and commitment to delivering a seamless backup experience, even in complex virtualized environments. By leveraging this feature, IT administrators can optimize backup performance, increase flexibility, and ensure reliable protection of their virtual infrastructure against data loss and downtime.
Shared Virtual Hard Disks (VHDX) — when virtual machines use shared VHDX files for clustering, these disks typically cannot be snapshotted. The skip disks feature allows such configurations to be backed up while excluding the shared VHDX, ensuring the process completes successfully.
Physical disks — for VMs that use physical disks through pass-through functionality (directly attached storage), standard snapshot methods do not apply. By skipping these disks, the backup can proceed smoothly, protecting the rest of the environment without interruption.
Virtual machines with Fibre Channel adapters — VMs configured with Fibre Channel adapters may encounter backup failures if the skip disks option is not enabled. Using this feature prevents such errors and helps maintain the stability and reliability of the backup operation.
This article provides information about prerequisites and requirements for VMware integration.
To access all VMware features, including advanced and LAN-free transport methods, Xopero ONE requires VMware version 6.7 or later.
Xopero ONE requires a commercial VMware license.
Xopero ONE works with both ESXi and vSphere.
If you use vSphere, connect Xopero ONE to the vSphere server rather than an individual ESXi host. Connecting directly to an ESXi host when a vSphere server is active may cause backup issues.
Installing a virtual appliance (VA) is optional-- you can protect your infrastructure without it, but deploying a VA is strongly recommended.
To connect VMware to Xopero ONE, you need a VMware administrative account. It is recommended to create a dedicated VMware user account for backup tasks.
MacOS devices are not supported for many VMware operations. You cannot use macOS devices to:
Register the VMware host in Xopero ONE.
Back up VMware virtual machines.
Deploy virtual appliance machines on the VMware host.
Learn how to protect a Hyper-V host with Xopero ONE.
Hyper-V, Microsoft’s virtualization platform, allows organizations to run multiple virtual machines efficiently on a single host. Ensuring the protection of both the Hyper-V host and its VMs is essential for maintaining business continuity and safeguarding data. This article outlines a simple guide on how to secure your Hyper-V environment using Xopero ONE, along with recommended best practices and additional resources.
To protect a Hyper-V host, start by installing a dedicated version of the Xopero ONE agent designed for Hyper-V environments. Once installed, the host will automatically appear in the Devices tab of Xopero ONE Management Service (XMS) admin panel.
Go to the Plans tab in the XMS dashboard and select + Add plan.

Select Devices from the platform list.

Choose the appropriate backup type based on your requirements and configure the settings to ensure proper protection of your Hyper-V host.

Select the Hyper-V host from the list of available devices and specify the type of data you want to back up.
Define the name of the backup plan.
Choose your backup storage location.
Next, set up the backup schedule and retention policy to define how often backups will run and how long they will be kept. In Advanced settings section you can also enable additional options, such as encryption and compression, to enhance data security and optimize storage usage.

After completing the configuration, click the Save button. The protection plan will then automatically begin protecting your Hyper-V host according to the schedule you defined.
This article describes how to add a Hyper-V server to Xopero ONE.
Log in to XMS, open the Virtual Machines tab on the left side of the window, and select Hyper-V from the list.

Click the Connect button under Hyper-V.

Download and install the agent on all Hyper-V hosts you want to protect. After installation, the device(s) will appear in the upper-right corner for activation. Once added, it will be listed in the Devices tab and ready to protect physical hardware.

Activated devices will now appear in the Available hosts section. Select the host(s) you want to integrate with, and click Save.

Specify the frequency at which the Hyper-V server should refresh.

Once these steps are complete, you can start planning your Hyper-V backup strategy.

Integrating a Hyper-V cluster in Xopero ONE follows the same procedure as adding a single host, with one key difference: the agent must be installed on every host in the cluster. When adding the cluster, select all machines to include in the setup and enter the cluster IP address, and administrator’s login credentials.

Learn how to restore whole virtual machines in Xopero ONE.
Open the Hyper-V tab (Virtual Machines > Hyper-V) in XMS, then click the Manage & Restore button next to the host whose backup you want to restore.

Select the VM you want to restore and click the restore  button.

After choosing the backup plan and VM version, click Restore under the backup copy you wish to recover and select the Whole machine option from the drop-down list.

Specify whether to restore the VM to its original location or a new one. Provide key details, including the restored VM’s name and desired power state (on/off) after restoration.

Next, select a directory for the VM configuration files, choose a location to store the VM disks, and assign a Hyper-V switch or resource pool for the network adapters.

Once configured, click Start now to begin the restoration process.
This article explains the process of creating a backup plan for Hyper-V virtual machines.
One of the key features of Xopero ONE is native Hyper-V backup. It enables you to back up either all virtual machines or selected VMs on both standalone and clustered Hyper-V hosts.
Log in to XMS, go to the Plans tab and click the + Add plan button in the top toolbar.

Select Hyper-V from the platforms list.

Define the name of the backup plan.
In the configuration aside, choose the host you want to protect. You can then either:
Back up all virtual machines (VMs) for comprehensive protection.
Select specific VMs by checking the boxes next to the desired entries.
Configure options specific to Hyper-V backup.

Choose your backup storage location.
Configure the Scheduler & data retention settings by defining when backups should run and which types of backup copies to use.
Go to the Advanced settings section to customize additional options, including encryption, compression levels, and deduplication. These settings provide greater flexibility and help optimize the backup process.

After completing the configuration, click the Save button. The protection plan will then automatically begin protecting your Hyper-V virtual machines according to the schedule you defined.
Instant restore - disaster recovery feature.
Instant restore provides immediate virtual machine recovery— it restores VM’s configuration files to the Hyper-V host, prepares the VM, and mounts its disks directly from the backup. This allows the Xopero ONE administrator to start using the VM almost immediately, without waiting for the full restoration.
Open the Hyper-V tab (Virtual Machines > Hyper-V) in XMS, then click the Manage & Restore button next to the host whose backup you want to restore.
Select the VM you want to restore and click the restore button.
After choosing the backup plan and VM version, click Restore under the backup copy you wish to recover and select the Instant restore option from the drop-down list.
Specify whether to restore the VM to its original location or a new one. Provide key details, including the restored VM name, desired power state (on/off) after restoration, and the iSCSI port to use.

Next, select a directory for the VM configuration files, choose a location to store the VM disks, and assign a Hyper-V switch or resource pool for the network adapters.
Once configured, click Start now to begin the restoration process.
You can monitor active instant restore tasks in the Tasks tab in XMS. When you're finished working with the VM, you can shut it down by canceling the instant restore job — click the X button and confirm the cancellation.

This article explains how to add a VMware ESXi or vCenter server to Xopero ONE.
Log in to XMS, open the Virtual Machines tab on the left side of the window, and select VMware from the list.

Click the Connect button under vSphere/ESX.

Provide the IP address or name of your VMware server, enter a username, and add or select a password from the Password Manager.

Select the default VMware agent—the device that can communicate with VMware and will handle adding it to Xopero ONE.
Specify the frequency at which the VMware server should refresh.
After completing the form, click Next to proceed. Once these steps are complete, you can start planning your VMware backup strategy.

"VMware": { "DiskAccessMode": 1 }Get-VMHostSupportedVersion | Where-Object { $_.IsDefault -eq $true }Learn more about planning your Hyper-V backup.
Using Xopero ONE, you can protect Hyper-V environments with native support for virtual machine backups, as well as file-level and image-level backups of the physical Hyper-V host.
The performance of the Hyper-V host is a key factor, as it determines how many virtual machines can be secured simultaneously.
You can create backup for all machines on the host and automatically include any new machines created in the future. In the backup plan, under Advanced settings in the Task balancing tab, you can specify how many virtual machines should be backed up simultaneously. Alternatively, you can back them up individually with breaks in between.
When protecting virtual machines, Xopero ONE uses the RCT (Resilient Change Tracking) function to detect changes in virtual machine disk blocks, enabling much faster backups. Alternatively, you can choose to use the classic, slower method.
You can configure the backup to bypass virtual machine disks that cannot be included in the system snapshot. This ensures the backup proceeds without those disks when snapshot inclusion isn't possible.
Backup of Hyper-V virtual machines is based on system snapshots. Different levels of support are available, but the goal is always to create application-aware snapshots, as they provide the highest consistency.
With the application-aware option, Hyper-V also creates file-system consistent snapshots. For this reason, it is recommended to keep the application-aware option enabled, especially when protecting various Linux distributions.
Learn about virtual appliance and its role in Xopero ONE backup.
A virtual appliance (VA) is a virtual machine image running on a Linux-based system with the Xopero ONE application pre-installed. It can be deployed through the Xopero ONE Management Service (XMS).
The main purpose of a VA is to act as a backup proxy. It enables the use of SCSI HotAdd, one of the fastest transport methods, which allows attaching devices to a running virtual machine. This capability is especially useful for both backup and restore operations.
The default virtual appliance (VA) configuration parameters are:
2 CPUs
4 GB RAM
100 GB disk space
Log in to XMS, open the Virtual Machines tab on the left side of the window, and select Deploy virtual appliance at the top.
The system will display the New VMware protection view, where you can select one of the VMware environments available in Xopero ONE.
The selected environment will be responsible for running the Xopero ONE virtual appliance. You can choose the specific host or cluster on which the machine will run, as well as the datastore that will store the virtual machine drives.
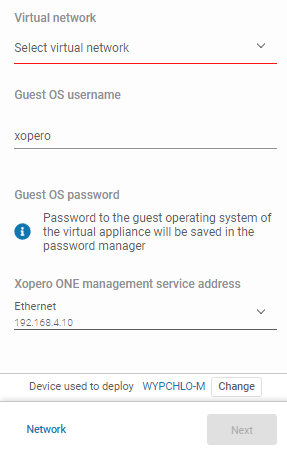
The next section is dedicated to the virtual network, where you can configure the network for your machine, guest OS username and password, as well as the Xopero ONE Management Service (XMS) address, which the application on the virtual appliance will use to establish a connection.
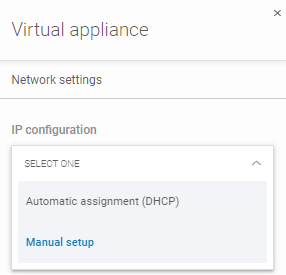
In Network settings you can also configure the IP settings by selecting Automatic assignment (DHCP) or Manual setup from the drop-down list. The first option automatically assigns network settings to the virtual machine adapter through the DHCP protocol, while the second option allows you to configure each parameter manually according to your preferences.
After making your selection and providing all the required details, click the Save button in Network settings, then click Next to install the virtual appliance. The system will display the progress of the deployment process.
Once the process completes successfully, the system will display a success message. You can now use the virtual appliance agent as a worker device in any VMware backup plan.
Overview of VMware backup options and features in Xopero ONE, including useful tools, transport methods, and backup capacity settings.
In Xopero ONE, when you're creating or editing a VMware backup plan, you can enable the application-aware backup option (available only for Windows Server versions). This allows you to create transactionally consistent backups or replicas of virtual machines.
This functionality relies on the Microsoft VSS (Volume Shadow Copy Service). VSS temporarily pauses the application and write requests (up to 60 seconds), flushes the file system buffer, and freezes the file system. This process ensures that file system metadata is written and that data is saved in a consistent order.
The Changed Block Tracking (CBT) tool calculates and provides Xopero with the differences between full, differential, and incremental backups; it's a VMware-provided tool that Xopero ONE uses by default.
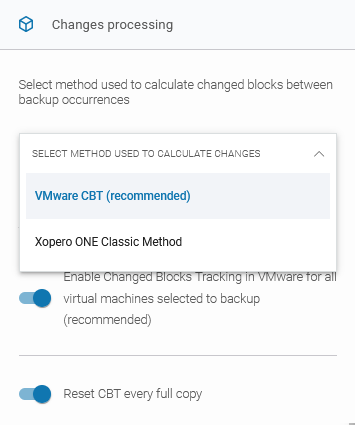
The method for calculating changes can be selected from the drop-down list. When VMware CBT (recommended) is selected, you can configure two additional checkboxes:
Enable Change Blocks Tracking in VMware for all virtual machines selected for backup (recommended) — when this option is enabled, CBT will be used for all protected virtual machines.
Reset CBT every full copy — when enabled, CBT will be reset during each full backup. Since CBT leaves markers indicating where the last changes occurred, this option clears those markers to prevent potential issues.
Following are all transport methods available in VMware backup settings:
Automatic (recommended) — Xopero ONE will automatically determine the best available transport method for each worker and apply it accordingly.
HotAdd — available only for virtual appliance workers (see for more details). This method creates a snapshot and a linked clone of the target virtual machine. The disk is then attached to the worker, which reads the linked clone’s virtual disks for backup.
SAN — this mode requires the backup server to have access to the SAN storage containing the virtual disks. A SAN backup worker must be a physical machine. In this mode, data is read directly from the VMware LUN
This feature skips SWAP partitions and files, as well as empty blocks. By using it, you can reduce the backup size and the time required to transfer the backup to storage.
This feature is enabled by default. Administrators can configure two additional settings:
Skip SWAP files, and partitions — SWAP files and partitions will be excluded from the backup.
Skip empty blocks — all empty blocks will be skipped during the backup.
Disk consolidation option forces consolidation of the source machine's disks on the VMware side before taking a snapshot to ensure virtual disk consistency and optimize I/O performance.
Learn how to use the most traditional method of restoring a virtual machine.
Open the VMware tab (Virtual Machines > VMware) in XMS, then click the Manage & Restore button next to the host whose backup you want to restore.
Select the VM you want to restore and click the restore button.
After choosing the backup plan and VM version, click Restore under the backup copy you wish to recover and select the Whole machine option from the drop-down list.
Specify whether to restore the VM to its original location or a new one:
Original location — the original location option automatically applies all settings from the backup, restoring the virtual machine to the same ESXi/vCenter, datastore, compute resource, and VM folder, with the same virtual network configuration. The only setting you can modify is the VM name.
New location — this option allows you to manually choose the location to which the VM will be restored and adjust additional settings:
After adjusting the VMware options, click Next to open the Restore data aside and configure the following settings:
VMware power state — lets you choose whether the virtual machine should start immediately after the restore or remain offline.
Transport method — allows you to choose one of the available transport methods:
Once configured, click Start now to begin the restoration process.
This article explains one of the VMware restore options: the iSCSI target method.
Xopero ONE offers a granular recovery feature that allows you to restore individual files and folders from a VMware virtual machine backup. This makes the restore process faster and more efficient in many unexpected situations.
Open the VMware tab (Virtual Machines > VMware) in XMS, then click the Manage & Restore button next to the host whose backup you want to restore.
Select the VM you want to restore and click the restore button.
After choosing the backup plan and VM version, click Restore under the backup copy you wish to recover and select the iSCSI target option from the drop-down list.
In the next aside, XMS displays all disks included in your virtual machine backup. You can choose which drives to include in your iSCSI target by clicking the Restore all button or selecting specific disks using the checkboxes and clicking Restore selected.
Next, configure the following settings:
iSCSI worker — allows you to select the device that will host and share the iSCSI target. You can choose any device added to the system that supports iSCSI target creation.
iSCSI settings — allows you to select the network adapter through which the target will be shared, as well as the port to be used — by default, port 3260 (dedicated for iSCSI targets).
Click the Run iSCSI button to start the process. If everything is configured correctly, a new entry will appear in the Tasks tab and will remain active until you stop it.
Once the iSCSI target is running, you only need to access it. To do this, use an iSCSI initiator (on Windows).
Press Windows + R to open the Run dialog, then type iscsicpl and press Enter to open the iSCSI Initiator Properties.
Use the Quick Connect option to locate your iSCSI target — enter the address of your iSCSI worker into the Target field and click Quick Connect... button.
At this point, the target is connected to your device. Now, you have to open Disk Management.
Press Windows + R to open the Run dialog, then type diskmgmt.msc and press Enter to open the Disk Management tool.
Look for a disk that is marked as Offline ℹ.
Instant restore provides a rapid virtual machine recovery. It restores the machine’s configuration files to the VMware datastore, prepares a virtual machine, and mounts the disks to run directly from the backup copy. This allows the Xopero ONE administrator to start using the virtual machine almost immediately, without waiting for the full restore to complete.
Open the Storages tab in XMS.
Select the browse button and choose the vault where the virtual machine backup is located.
Select the backup plan and the version of the virtual machine you want to restore.
After choosing the backup plan and VM version, click Restore under the backup copy you wish to recover and select the Instant restore option from the drop-down list.
Specify whether to restore the VM to its original location or a new one:
Original location — the original location option automatically applies all settings from the backup, restoring the virtual machine to the same ESXi/vCenter, datastore, compute resource, and VM folder, with the same virtual network configuration. The only setting you can modify is the VM name.
New location — this option allows you to manually choose the location to which the VM will be restored and adjust additional settings:
Enter the VM's name, and click Next.
Decide whether the restored machine should start automatically and select the port to use.
Double-check your settings and start the restoration process by clicking the Start now button.
The machine will be available on your VMware server. If everything is configured correctly, a new entry will appear in the Tasks tab and will remain active until you stop it.
After you finish working with the machine, you can shut it down by canceling the current instant restore job. To do this, click the X button and confirm that you want to cancel the instant restore task.
Functionality and mechanisms of VMware backup plans in Xopero ONE.
Xopero ONE provides secure, consistent protection for virtual machines by capturing entire VM data or selected disks according to defined backup policies. Data is collected directly from the VMware environment, then encrypted before transfer to the designated storage datastore. Backup jobs follow configured schedules and retention policies, ensuring data integrity, efficient storage usage, and rapid recovery in case of system failure or data loss.
Using Xopero ONE, you can protect multiple components of your IT infrastructure, including VMware environments. Each environment can have its own specific backup configuration and may use either a or a local backup agent.
In VMware environments, efficient communication and data transfer to data stores are critical. Fast transport methods, like HotAdd, require a virtual appliance (VA). Without it, local devices acting as VMware backup agents (workers) transfer data over the LAN—first to the agent and then to storage—resulting in much longer transfer times. For improved backup efficiency, it is recommended to use a VA rather than a local agent.
To test VMware snapshots for Xopero ONE, create a snapshot as follows:
This article explains how to configure and run a VMware test restore.
Log in to XMS, go to the Restore tab (Plans > Restore) and click the + Add plan button in the top toolbar.
Define the name of the backup plan, then click
LAN — also called NBD/NBDSSL. In this mode, the ESXi host reads data from the storage and sends it over the network to the worker. This method is typically used when no other transport option is available.


VMware environment — this field allows you to select the ESXi host or vCenter where the data will be restored (the list displays only servers that are connected to Xopero ONE).
Compute resource — lets you choose the compute resource infrastructure to process the recovered data.
Datastore — the location where the virtual machine files will be stored. Xopero ONE operates within the selected VMware environment.
VM folder — lets you select the specific directory on the datastore where the VM will be restored.
Virtual network — allows you to select your virtual network resource.
Automatic (recommended) — Xopero ONE will automatically determine the best available transport method for each worker and apply it accordingly.
HotAdd — available only for virtual appliance workers (see this article for more details). This method creates a snapshot and a linked clone of the target virtual machine. The disk is then attached to the worker, which reads the linked clone’s virtual disks for backup.
SAN — this mode requires the backup server to have access to the SAN storage containing the virtual disks. A SAN backup worker must be a physical machine. In this mode, data is read directly from the VMware LUN storage where the virtual disks are located.
LAN — also called NBD/NBDSSL. In this mode, the ESXi host reads data from the storage and sends it over the network to the worker. This method is typically used when no other transport option is available.
Restore settings — allows you to limit the internet bandwidth.
Device used to restore the data — lets you choose the device (worker) directly responsible for restoring your virtual machine. You can have multiple workers and assign different ones to each backup plan or restore process. A worker can be either a physical or a virtual machine.


The system will display a report of the targets discovered at the specified address and indicate the connection status (whether it was successful or not).
Click the Done button to close the report. The target should now appear in your Discovered Targets list with a connected status.
Right-click the offline disk and select the Online option to bring it online.
Once the disk is online, you will see the drive letters assigned to its partitions. You can now open File Explorer to access your files.


VMware environment — this field allows you to select the ESXi host or vCenter where the data will be restored (the list displays only servers that are connected to Xopero ONE).
Compute resource — lets you choose the compute resource infrastructure to process the recovered data.
Datastore — the location where the virtual machine files will be stored. Xopero ONE operates within the selected VMware environment.
VM folder — lets you select the specific directory on the datastore where the VM will be restored.
Virtual network — allows you to select your virtual network resource.


VMware backup copies are created using system snapshots. For machines running Windows, Xopero ONE uses file-system consistent backups by default. Application-aware backups can be enabled for machines running Windows Server.
Only crash-consistent backups are supported on Linux systems.
In Xopero ONE, when creating or editing a VMware backup plan, you can enable the application-aware backup option (available only for machines running Windows Server), which allows you to create transactionally consistent backups or replicas of virtual machines.
The functionality relies on Microsoft VSS (Volume Shadow Copy Service) technology, which temporarily silences the application, pauses write requests for up to 60 seconds, flushes the file system buffer, and freezes the file system. This ensures that file system metadata is recorded and data is saved in a consistent order.
File-system consistent backups achieve consistency by capturing a snapshot of all data on the virtual disks simultaneously. These snapshots flush in-memory buffers to disk and synchronize file system metadata and open files, ensuring that the logical relationships among data on the disk are accurate and complete.
While a file-system consistent backup ensures that the file system itself will not be corrupted upon restore, it does not guarantee that running applications are in a consistent state. To create an application-consistent snapshot, the application should be paused or quiesced before taking the snapshot. This ensures that all in-memory operations are safely written to disk, allowing a reliable and consistent restore.
A crash-consistent backup captures all data on a disk at a single, precise moment, similar to abruptly powering off the system*. It ensures write-order consistency, meaning files are not corrupted, but it does not capture in-memory data or pending I/O transactions. As a result, crash-consistent backups are suitable for file servers but not for active databases or email servers. They are faster and simpler to perform, but less reliable for transactional workloads.
*The term "crash-consistent" indicates that the backup reflects the system state just before a server crash, power-off, or reset, effectively serving as a restore point.
Xopero ONE relies on the Volume Shadow Copy Service (VSS) to create application-aware backups, coordinating with VSS-aware applications such as Microsoft Exchange and Microsoft SQL Server. This method ensures that both the file system and the running applications are captured in a consistent state, allowing reliable restoration of application data.
When the full VSS backup option is enabled, the backup captures all relevant data via shadow copy and notifies the application that the full backup has been completed. This allows transaction logs to be safely truncated, helping to manage storage and maintain application health.
Enabling full VSS backup is recommended in the following cases:
Xopero ONE ensures the resilience of VMware machine backups and restores against network issues. In the event of temporary disconnections, the system automatically retries connecting to the machine's disk, ensuring that backup tasks complete successfully.
Additionally, administrators can use direct disk access via the VMware datastore to shorten the data transfer path, minimize network issues, and improve backup performance.
Xopero ONE allows administrators to force disk consolidation of the source machine's disks on the VMware side before taking a snapshot, ensuring virtual disk consistency and optimizing I/O performance. The disk consolidation option can be enabled in the backup plan settings.
In scenarios where the virtual appliance (VA) fails, such as during a sudden service outage, VMware machine disks mounted to the VA may remain attached. This can block disk consolidation and leave behind unnecessary incremental VMDK files. To ensure proper disk consolidation and prevent disk space from filling up in the affected VMware environment, Xopero ONE uses a mechanism that, at the start of a backup task, identifies disks still attached to the VA and safely unmounts them, freeing the locked resources.
In the Choose item section, select the resource to restore data from.
Next, choose a backup plan from the list (the system will automatically select the latest backup). Then, select one of the two restore type options:
Whole machine — this option restores the entire machine’s data to VMware from the backup. Selecting this option lets you choose the : Automatic (recommended), HotAdd, or LAN. You can also reduce network bandwidth for the restore operation.
Instant restore — restores the machine using mounted disks that run directly from the backup (via iSCSI). This method skips sending data, making it much faster. Specify the device and port to expose the resource through the iSCSI target.
Make sure the selected agent has access to the chosen storage. If it doesn’t, or you need to change it, click the Change button at the bottom.
After selecting the restore type, the restore options aside will appear. You can restore the virtual machine to its original location or connect it to a different one:
Original location — the original location option automatically applies all settings from the backup, restoring the virtual machine to the same ESXi/vCenter, datastore, compute resource, and VM folder, with the same virtual network configuration. The only setting you can modify is the VM name.
New location — this option allows you to manually choose the location to which the VM will be restored and adjust additional settings:
VMware environment — this field allows you to select the ESXi host or vCenter where the data will be restored (the list displays only servers that are connected to Xopero ONE).
Compute resource — lets you choose the compute resource infrastructure to process the recovered data.
Datastore — the location where the virtual machine files will be stored. Xopero ONE operates within the selected VMware environment.
In the verification section, you can define how long the system should wait while restoring and booting the virtual machine (the process of starting the computer and loading the operating system after restoration). You can also enable options to power on the virtual machine, take a screenshot after startup for verification, and delete the machine after a successful restore.
Define when the plan should be executed. You can also exclude specific hours using the backup window and enable the option to not suspend the plan during the restore process.
In Advanced settings, you can configure error handling and set the number of task retries in case of an error.
Save the plan and wait for it to run on schedule, or click Save & run to start it immediately. You can monitor active test restore tasks in the Tasks tab.
You can verify the correctness of the completed test restore task in the Tasks tab.
Click the task details button on the right to view additional information, such as a screenshot of the restored machine.
In addition to the task summary, you can enable email notifications with the recovery task summary. To receive them, go to ⚙ Settings, open Email notifications, and then select the Restore verification summary option.


List of the minimum VMware permissions required to use Xopero ONE.
For Xopero ONE to back up and restore VMware environments, the assigned permissions must cover all resources that need protection, ensuring your virtual machines and configurations can be securely accessed and managed.
Below is a list of all permissions required by Xopero ONE to back up and protect your VMware environment. Click each section to expand it and view the full set of privileges.
Low level file operations
System resources
Edit inventory:
Guest operations:
Interaction:
Provisioning:
Snapshot management:


VM folder — lets you select the specific directory on the datastore where the VM will be restored.
Virtual network — allows you to select your virtual network resource.


How to create a VMware backup plan.
One of the key features of Xopero ONE software is VMware backup. The system enables you to back up all or selected virtual machines hosted on your ESXi or vCenter server. This article focuses on creating a VMware backup plan.
Log in to XMS, go to the Backup tab (Plans > Backup) and click the + Add plan button in the top toolbar.
Select VMware from the platforms list.
Define the name of the backup plan.
Select one of the available ESXi or vCenter servers (from those already connected to Xopero ONE) and choose which virtual machines you want to protect. You can select Protect all to include all VMs from the chosen server, or Select VMs to manually add only specific virtual machines.
Click the Edit button next to the VMware backup options section to configure the following settings:
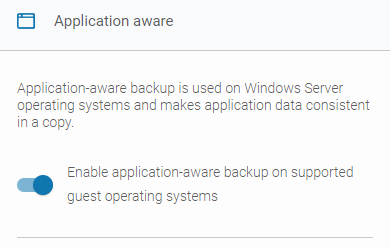
Application aware — a VSS-based feature that ensures a consistent backup of the virtual machine and its applications (for example, Windows Server systems running Microsoft SQL Server, Microsoft Exchange, or Microsoft Active Directory). In Xopero ONE, you can enable application-aware backup on supported guest operating systems (recommended). You can also choose to continue the backup in case of application errors—if this option is enabled, the backup process will proceed even if the application-aware feature encounters an error.
Specify the backup location by choosing from the available storage options within your service.
Configure the by defining when backups should run and which types of backup copies to use.
Go to the Advanced settings section to customize additional options, including encryption, compression levels, and deduplication. These settings provide greater flexibility and help optimize the backup process.
After completing the configuration, click the Save button. The protection plan will then automatically begin protecting your VMware virtual machines according to the schedule you defined.
Changes processing (CBT) — a feature that lets you configure how differential and incremental backups are performed. You can choose between the following options:
VMware CBT (recommended) — a VMkernel feature that tracks changes to the storage blocks of virtual machines over time. For VMware CBT, there are two additional settings: Enable CBT in VMware for all VMs included in the backup, and Reset CBT for every full copy to prevent any issues related to CBT.
Xopero ONE classic method — a less efficient but useful option when VMware CBT fails. This method compares data block by block to identify changes between the previous and current backup.
Virtual machine state — an optional feature that lets you specify the VM states in which the backup should be performed. If a virtual machine is in a different state than the one selected, it will not be included in the backup process.
Transport method — defines how virtual machines are transferred between VMware and the backup worker. There are four options available:
Automatic (recommended) — Xopero ONE will automatically determine the best available transport method for each worker and apply it accordingly.
HotAdd — available only for virtual appliance workers (see for more details). This method creates a snapshot and a linked clone of the target virtual machine. The disk is then attached to the worker, which reads the linked clone’s virtual disks for backup.
SAN — this mode requires the backup server to have access to the SAN storage containing the virtual disks. A SAN backup worker must be a physical machine. In this mode, data is read directly from the VMware LUN storage where the virtual disks are located.
LAN — also called NBD/NBDSSL. In this mode, the ESXi host reads data from the storage and sends it over the network to the worker. This method is typically used when no other transport option is available.
Skip SWAP and empty blocks — Xopero ONE allows you to reduce backup size using two additional options:
Skip SWAP files, and partitions — when this option is enabled, Xopero ONE will skip swap partitions and files. These function as virtual memory, storing temporary data that is not currently used by RAM.
Skip empty blocks — when this option is enabled, Xopero ONE will skip empty blocks that do not need to be backed up, reducing the overall backup size.
Disk consolidation: when this option is enabled, Xopero ONE forces consolidation of the source machine's disks on the VMware side before taking a snapshot.
Default worker — device directly responsible for backing up your virtual machines. You can have multiple workers and assign different workers to each backup plan. A worker can be either a physical or virtual machine.