In this article you will learn how to configure your Xopero ONE login with SAML.
Xopero ONE integration works via the SAML 2.0 protocol, meaning any platform supporting this protocol can be integrated with Xopero ONE.
The configuration process is straightforward and requires only the entity ID, metadata URL, reply URL, and logout URL (the names may vary depending on the naming conventions used by specific platforms). In some cases, a certificate and a private key are also required.
Do not test the integration in the IdP panel (for example, the Azure Portal) as it will initiate login from the IdP panel.
Below table illustrates SAML integration configuration for selected platforms, including Auth0, Entra ID, CyberArk, Google, JumpCloud, Okta, and OneLogin.
Open your Auth0 admin dashboard, go to Dashboard > Applications > Applications, and hit Create Application button in the top-right corner of the screen.
In Create application window enter a unique, custom application name (in this example we'll be using XoperoAuth0), select Regular Web Applications option, and click Create:
In the newly created application window go to Settings tab, scroll down to the very bottom, and click Advanced Settings collapsible to expand it.
Go to the Endpoints tab and locate SAML section. Copy the SAML Metadata URL and save it for later — it will be needed for Xopero ONE configuration.
Scroll back to top and open the Addons tab, then toggle the SAML2 WEB APP button.
In the window that opens up open the Settings tab and enter the Application Callback URL as follows:
https://XoperoONEManagementServiceURL/Auth/AssertionConsumerService
In the same tab, scroll down inside the code input field and uncomment 31st, 32nd and 33rd line, then edit line 32 as follows:
Once done, scroll down to the bottom of the addon window and click Enable button, then close the window to finish app configuration.
Login to your XMS web panel, go to Settings (bottom-left corner in the left-hand side menu) and select External Identity Providers.
Click Add new provider button and fill in the details:
Name: your own custom name, i.e., Auth0
Entity ID: should be the same name you've set as application name in Auth0 (in this example it's XoperoAuth0)
Next, paste the previously copied SAML Metadata URL in the Metadata URL field.
Add certificate and password if required.
Set up a default Language and Role for users with Auth0 SAML authentication permissions.
Double-check the settings and hit Save at the bottom of Add identity provider tab.
Login to , select Microsoft Entra ID and click Manage > Enterprise applications.
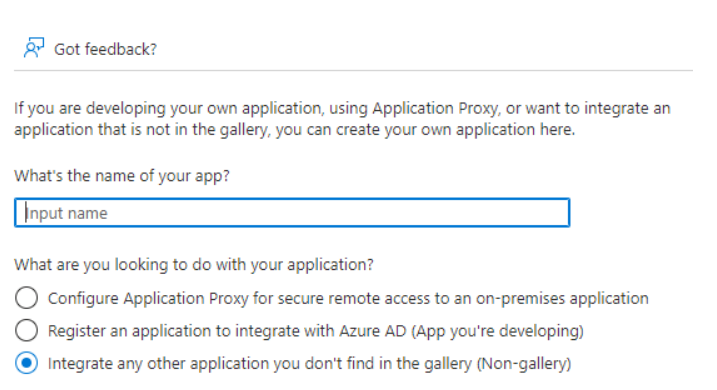
Click the New application button and then Create your own application.
Enter a custom name for the app and select Integrate any other application you don’t find in the gallery (Non-gallery).
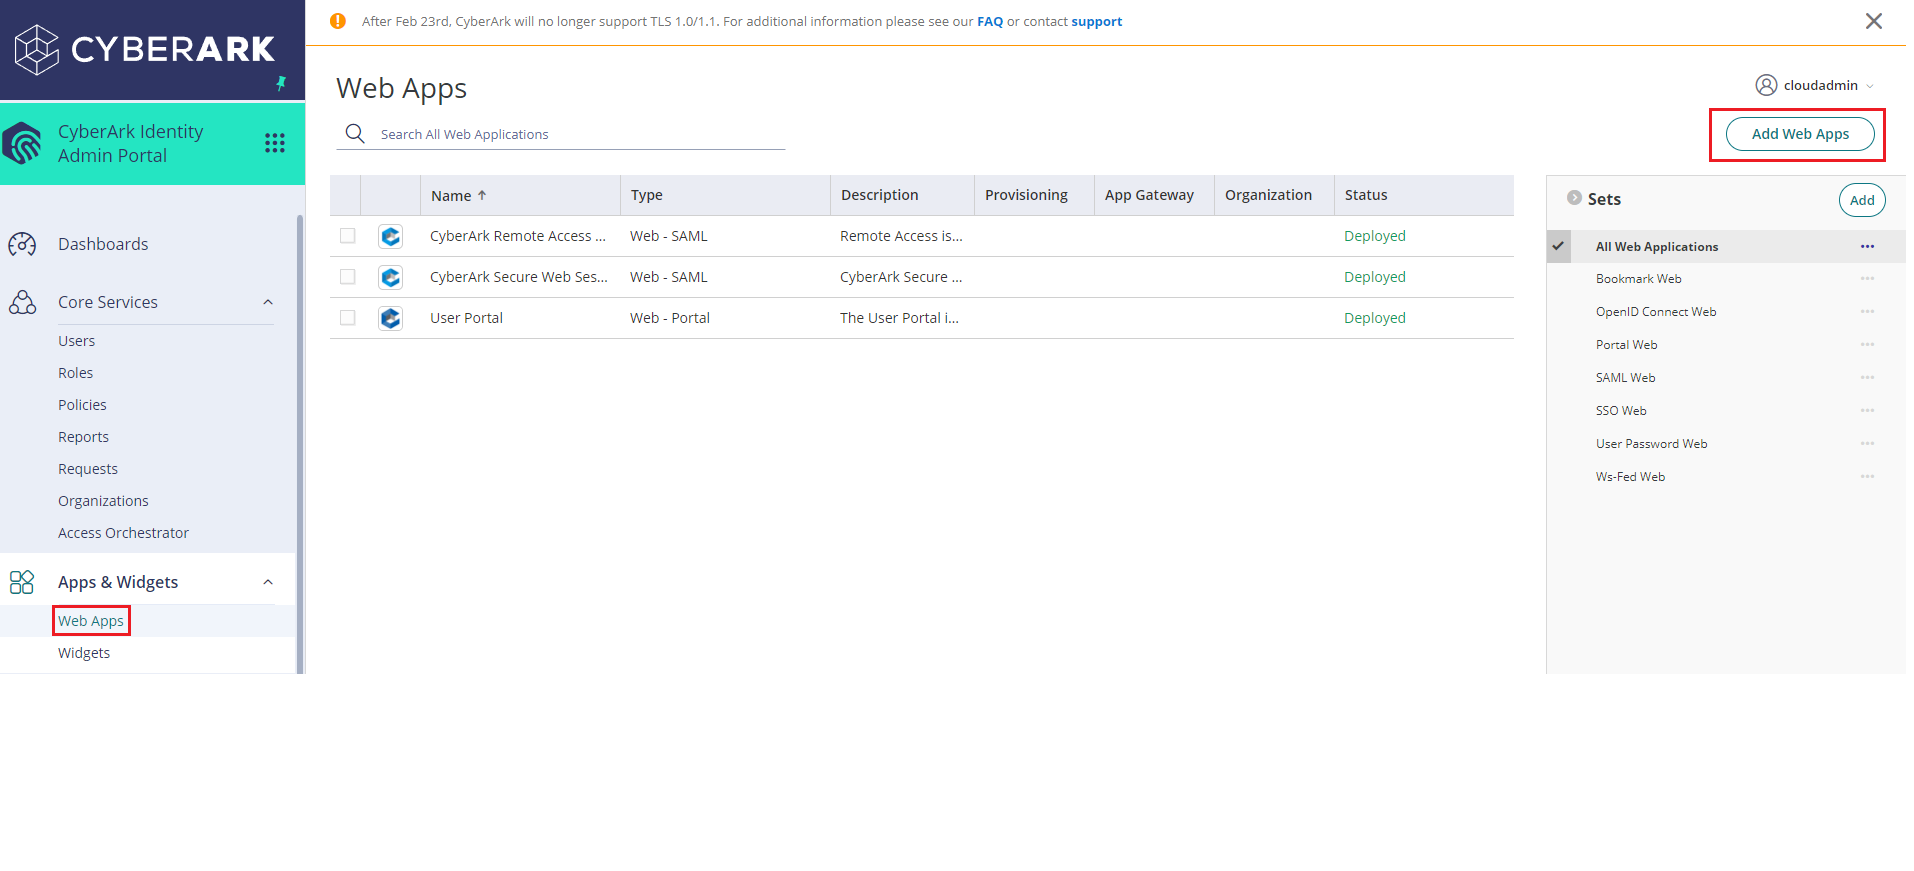
Log in to your CyberArk account. Expand Apps & Widgets dropdown menu and select Web Apps.
Click Add Web Apps button in the top-right corner.
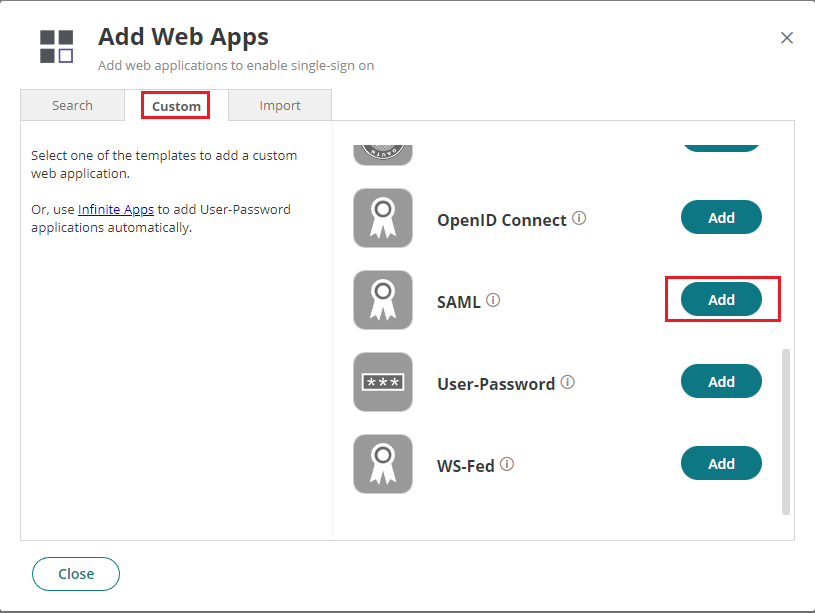
Go to Custom
Login to your Google admin console. Next, click the burger menu icon in the top-left corner of the screen and go to Apps > Web and mobile apps. Click Add app and select Add custom SAML app from the drop-down menu.
In the app details page create a custom name for your app and type it in App name field, then click Continue.
Log in to the JumpCloud Admin Portal, navigate to USER AUTHENTICATION > SSO Applications, and then click + Add New Application.
In Create New Application Integration window search for Custom Application, select it, and hit Next.
PKCS #12 file with X.509 certificate and private key (usually a .pfx file; can be password protected) must be included in IdP configuration in Xopero ONE. X.509 certificate file (usually a .crt file) for signature verification on IdP side must be included in application configuration defined in Okta panel.
Both files contain the same certificate. The PKCS #12 file also contains a private key to this certificate.
In Admin dashboard (in the right-top corner of the window) expand the Applications tab and select the Applications option.
Login to your OneLogin admin console and go to Applications > Applications > Add App.
Search for SAML Custom Connector (Advanced) and select the first result from the search results.
Next, enter a unique, custom name for the app in Display Name field and hit Save
To log in to Xopero ONE using a SAML-integrated identity provider, always start from the Xopero ONE panel. Do not log in from the IdP panel (for example, the Okta panel) to the application configured for Xopero ONE — the only exception is JumpCloud, which provides a built-in option to log in directly from its panel.
To enable an existing Xopero ONE user to log in via an identity provider (IdP), you must turn on the IdP login toggle for that account (⚙️ Settings > Accounts > Edit). Once an account is set to use an identity provider (IdP) for authentication, it cannot be switched back. To change the authentication method, you must delete the account and add it again.
Confirm the configuration and click Create button.
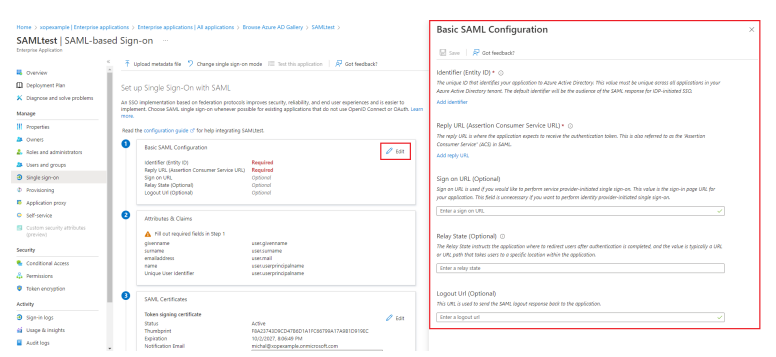
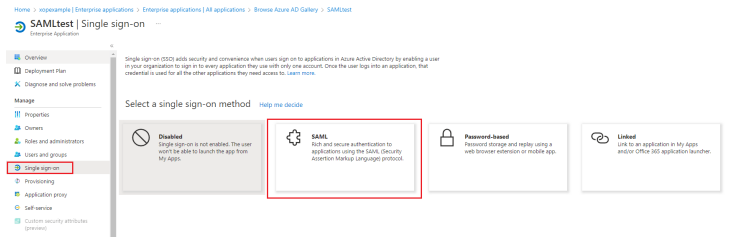
Open the Single sign-on tab and select SAML method.
Click the Edit button in Basic SAML Configuration section to edit it.
Set up a unique Identifier (Entity ID) i.e., SAMLTestAzure
Enter the following URL in Reply URL (Assertion Consumer Service URL) section:
https://XoperoONEManagementServiceURL/Auth/AssertionConsumerService
Change the Logout Url (Optional) to the following address:
https://XoperoONEManagementServiceURL/auth/SAMLLogoutResponse
Double-check if the info you have entered is correct and click the Save button.
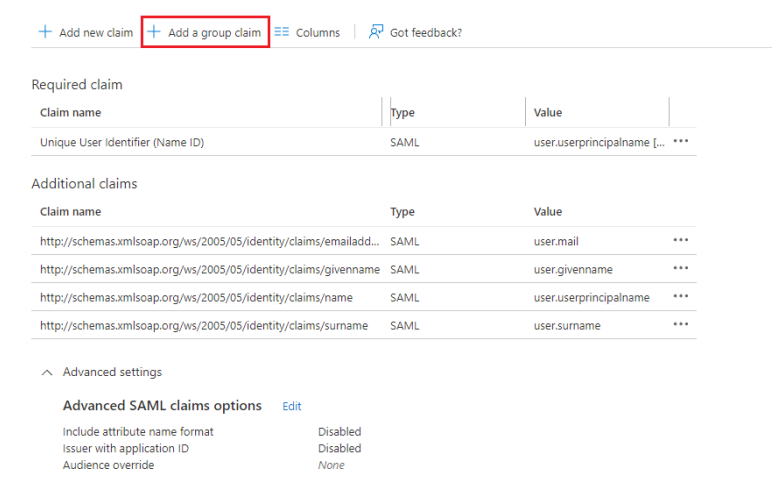
Next, click the Edit button in Attributes & Claims section and click + Add a group claim button.
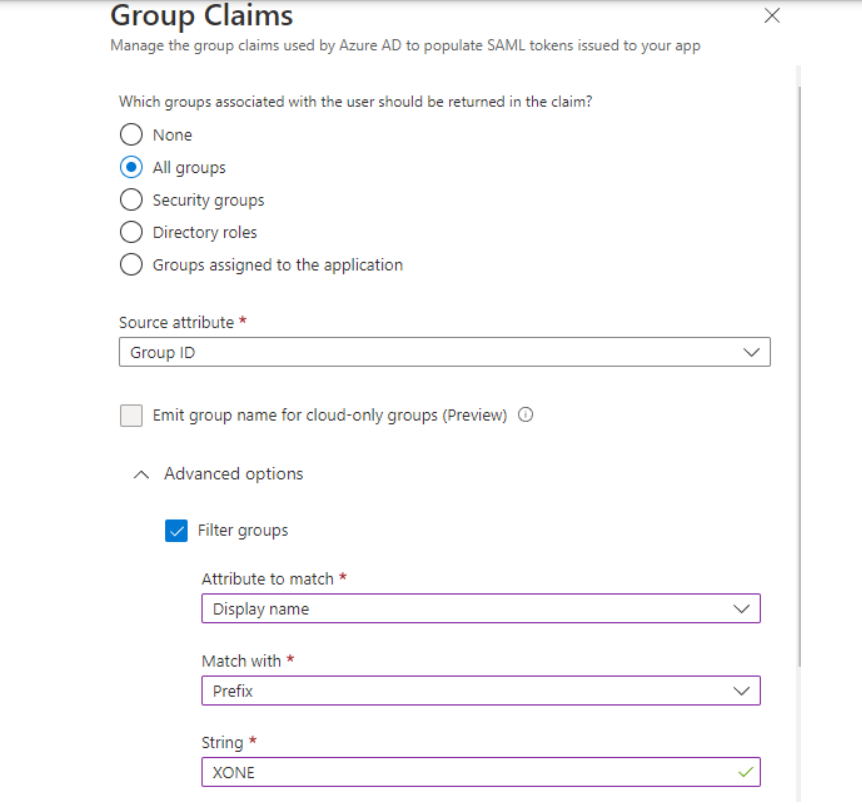
Select All groups and go to Advanced options. Check the Filter group box and fill in the fields as follows:
Attribute to match: Display name Match with: Prefix String: XONE
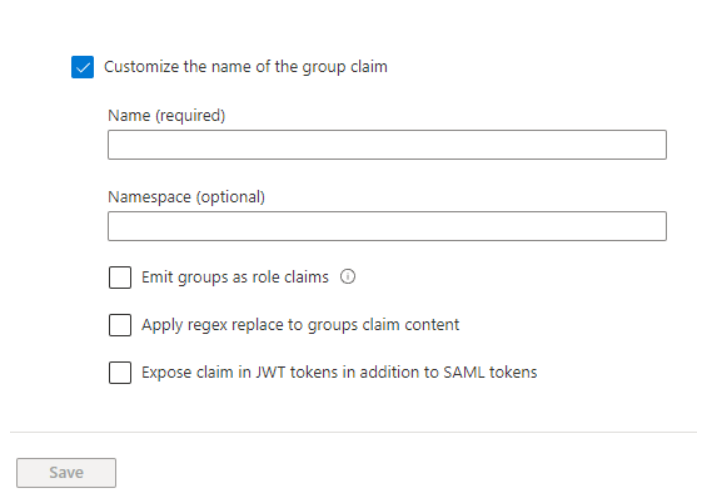
Check the Customize the name of the group claim checkbox. Enter xoperogroup in the Name field and save your settings.
Go back to SAML-based Sign-on page and copy the App Federation Metadata Url.
Save your settings.
Open the Users and groups tab and click + Add user/group button. Select users you want to be able to login to Xopero ONE and save your settings.
Login to your XMS web panel, go to Settings (bottom-left corner in the left-hand side menu) and select External Identity Providers.
Click Add new provider button and fill in the details:
Name: your own custom name, i.e., Entra ID
Entity ID: should be the same name you've set in Identifier (Entity ID) in Azure Portal (in this example it's SAMLTestAzure)
Next, paste the previously copied App Federation Metadata Url in the Metadata URL field.
Add certificate and password if required.
Set up a default Language and Role for users with Entra ID SAML authentication permissions.
Double-check the settings and click Save at the bottom of Add identity provider tab.
Click Save to finish the setup. You can now log out and test your configured SAML login integration.
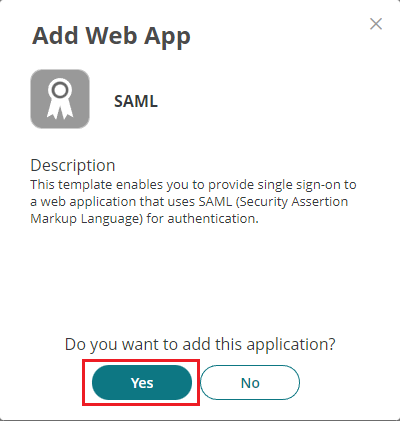
Confirm adding SAML as a web app.
You’ll be redirected to SAML web app settings. Start with setting up a custom name for the app (i.e., XONESAML).
Next, set up a unique Application ID in Advanced section and Save your settings (in this example we will be using XONESAMLID).
Open the Trust tab and copy Metadata URL in Identity Provider Configuration section (it will be needed later for Xopero ONE configuration).
Next, scroll down to Service Provider Configuration section, set it to Manual Configuration, and enter the following data:
In SP Entity ID / Issuer / Audience type your previously defined Application ID (in this example it is XONESAMLID)
In Assertion Consumer Service (ACS) URL enter:
https://XoperoONEManagementServiceURL/Auth/AssertionConsumerService
In Single Logout URL enter:
https://XoperoONEManagementServiceURL/auth/SAMLLogoutResponse
Go to SAML Response tab and scroll down to Script to set custom claims section. Enter the following script and press the Save button:
Head over to Permissions tab, click Add button, select all users you want to authorize to use SAML integration, and Save your settings.
Login to your XMS web panel, go to Settings (bottom-left corner in the left-hand side menu) and select External Identity Providers.
Click Add new provider button and fill in the details:
Name: your own custom name, i.e., CyberArk
Entity ID: should be the same name you've set in Application ID in CyberArk (in this example it's XONESAMLID)
Next, paste the previously copied Metadata URL in the Metadata URL field.
Add certificate and password if required.
Set up a default Language and Role for the users with CyberArk SAML authentication permissions.
Click Save to finish the setup. You can now log out and test your configured SAML login integration.
Next, click DOWNLOAD METADATA button under Option 1: Download IdP metadata. Upload the downloaded file to your web server and save its URL (it will be needed later for Xopero ONE configuration).
Click Continue and in the next window screen fill the Service provider details as follows:
ACS URL:
https://XoperoONEManagementServiceURL/Auth/AssertionConsumerService
Entity ID: custom, globally unique name (in this example we'll be using SAMLGOOGLE)
Start URL (optional): your XoperoONEManagementServiceURL
Once done, click Continue and on the next page hit Finish.
Back on the admin console main page, click the burger menu in the top-left corner, go to Apps > Web and mobile apps, then select your newly created SAML app.
Click User access and select either On for everyone or Off for everyone based on your organization's needs.
Once done, hit Save to finish the configuration process.
Login to your XMS web panel, go to Settings (bottom-left corner in the left-hand side menu) and select External Identity Providers.
Click Add new provider button and fill in the details:
Name: your own custom name, i.e., Google
Entity ID: should be the same name you've set in Google (in this example it's SAMLGOOGLE)
Next, paste the previously copied metadata URL in the Metadata URL field.
Add certificate and password if required.
Set up a default Language and Role for the users with Google SAML authentication permissions.
Click Save to finish the setup. You can now log out and test your configured SAML login integration.
Check Manage Single Sign-On (SSO) checkbox and select Configure SSO with SAML option., then hit Next.
In Enter general info set a unique custom application name (in this example we'll be using XONE), type it in Display Label field, and click Save Application.
In your new application settings go to SSO tab and fill the fields as follows:
IdP Entity ID: your unique application name (in this example it's XONE)
SP Entity ID: your unique application name (in this example it's XONE)
Click the Copy Metadata URL button under JumpCloud Metadata at the top and save it for later— it will be needed for Xopero ONE configuration in XMS.
Scroll down, set SAMLSubject NameID to email, and for SAML Subject NameID Format select urn:oasis:names:tc:SAML:1.1:nameid-format:emailAddress from the drop down menu.
In Sign section select Assertion. The IDP URL should read:
https://sso.jumpcloud.com/saml2/xone
In Attributes section add a new logout response by filling the fields as follows:
Service Provider Attribute Name:
https://XoperoONEManagementServiceURL/auth/SAMLLogoutResponse
JumpCloud Attribute Name: select email from the drop-down menu
Click Save to update the connector and move to the User Groups tab. Select the groups/users you want to enable JumpCloud SAML authorization for Xopero ONE login to.
Double-check if the data you entered is correct and save your configuration.
Login to your XMS web panel, go to Settings (bottom-left corner in the left-hand side menu) and select External Identity Providers.
Click Add new provider button and fill in the details:
Name: your own custom name, i.e., JumpCloud
Entity ID: should be the same name you've set in SSO IDP Entity ID in JumpCloud (in this example it's XONE)
Next, paste the previously copied Metadata URL in the Metadata URL field.
Add certificate and password if required.
Set up a default Language and Role for the users with JumpCloud SAML authentication permissions.
Click Save to finish the setup. You can now log out and test your configured SAML login integration.
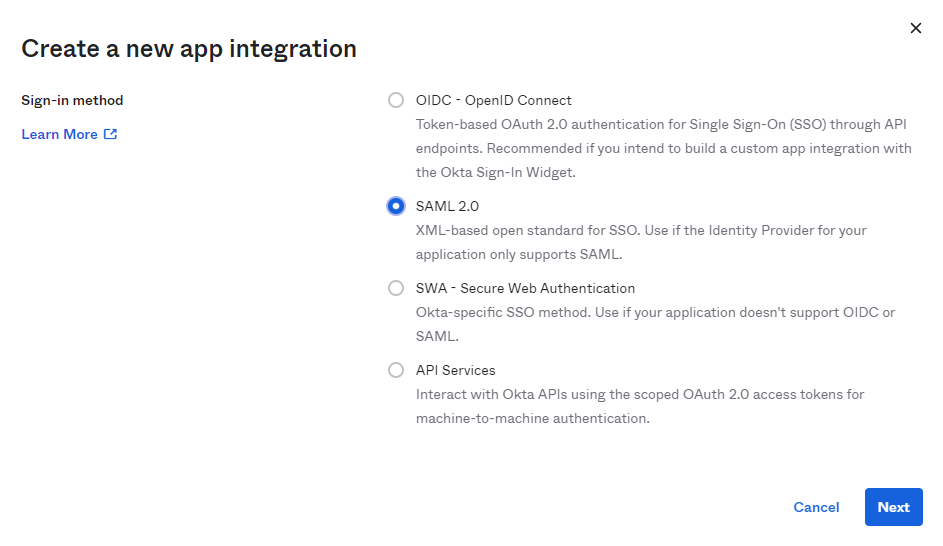
Hit Create App Integration button and select SAML 2.0.
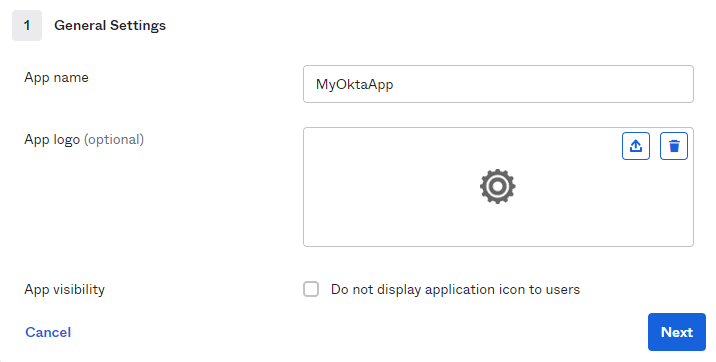
In General Settings enter a unique application name and move to Configure SAML section.
In Configure SAML tab set the Single sign-on URL parameter as follows:
https://XoperoONEManagementServiceURL/Auth/AssertionConsumerService
In Audience URL type your unique application name that you've previously set in General Settings tab.
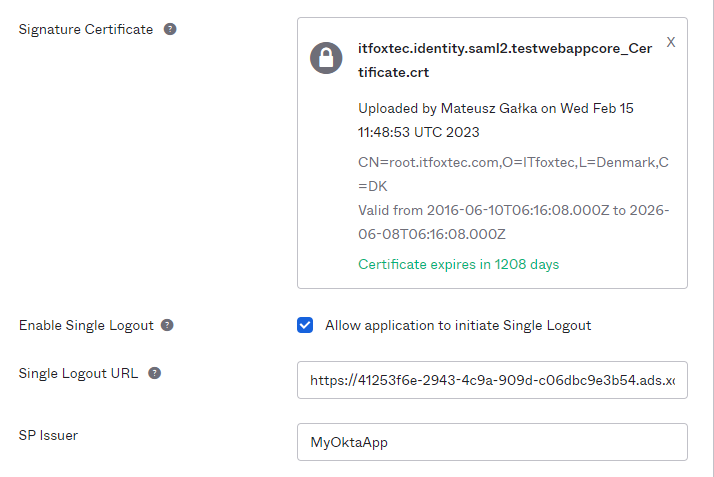
Click Show advanced settings and upload the certificate file to Signature Certificate field. Check Allow application to initiate Single Logout checkbox in the Enable Single Logout section— it's necessary.
You will now see two additional fields under Enable Single Logout— fill them as follows:
Single Logout URL:
https://XoperoONEManagementServiceURL/auth/SAMLLogoutResponse
SP Issuer: your unique application name that you've previously set in General Settings tab (in this example it's MyOktaApp)
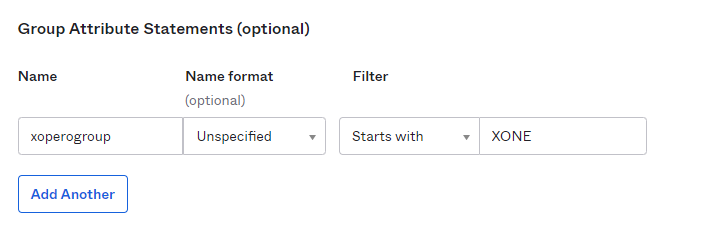
Next, go to Group Attribute Statements section and fill it as follows:
Name: xoperogroup
Starts with: XONE
Double-check if the data you've entered is correct and click Next. In the next window select I'm an Okta customer adding an internal app option, then hit Finish.
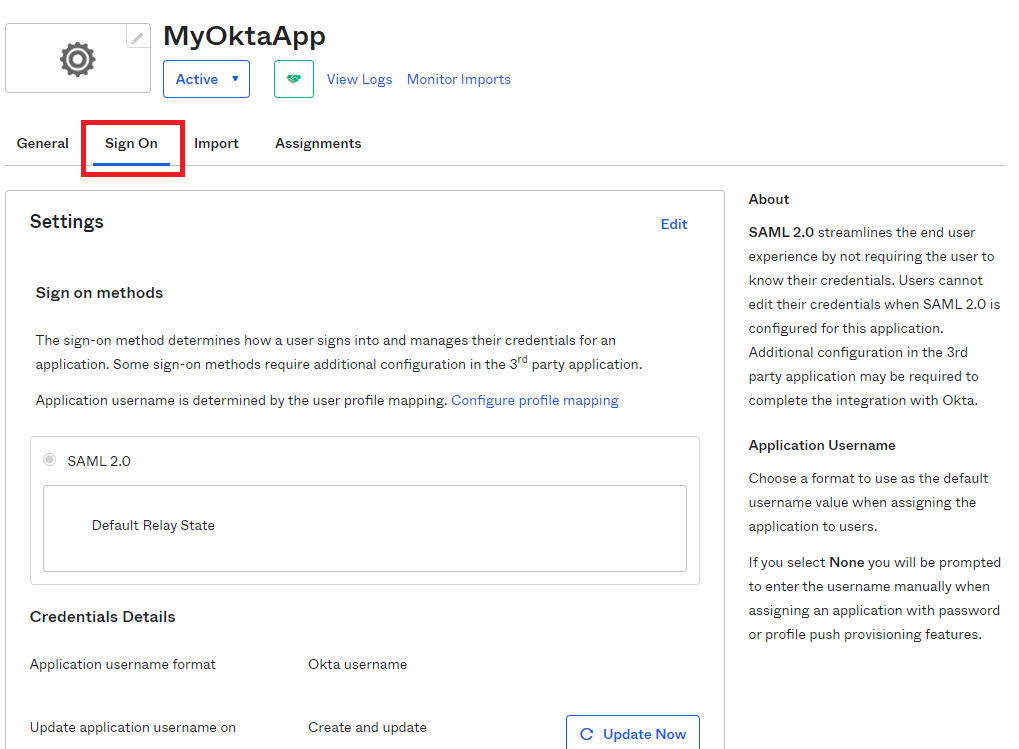
Open the created application and go to Sign On tab.
In SAML Signing Certificates section select your uploaded certificate and click Actions > View IdP metadata. Copy the URL of the opened page— it will be required later in Xopero ONE configuration.
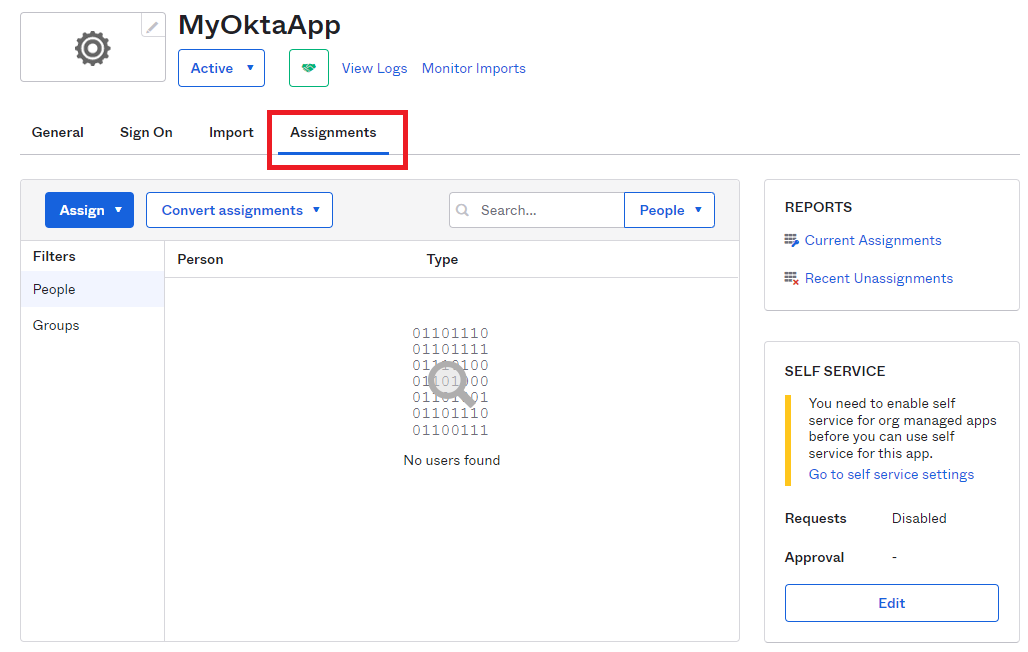
Once done, go to the Assignments tab.
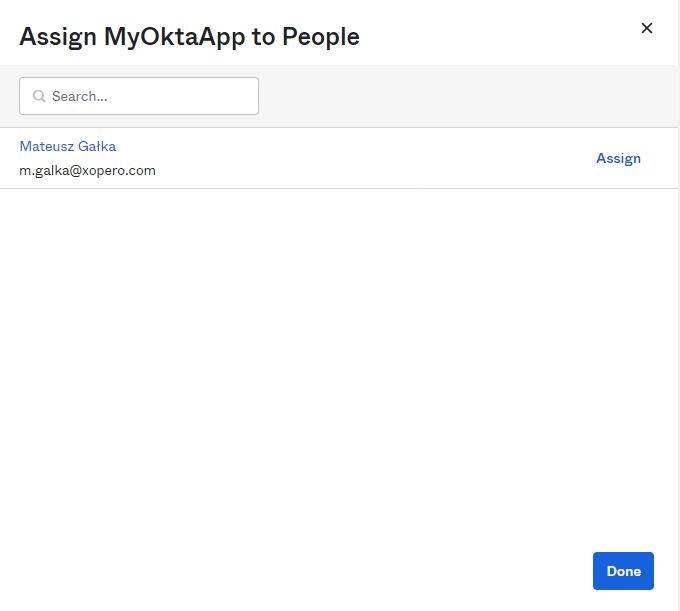
Assign the application to a selected user, or group. Hit Done to finish the configuration.
Login to your XMS web panel, go to Settings (bottom-left corner in the left-hand side menu) and select External Identity Providers.
Click Add new provider button and fill in the details:
Name: your own custom name, i.e., Okta
Entity ID: should be the same name you've set in General Settings in Okta (in this example it's MyOktaApp)
Next, paste the previously copied IdP metadata URL in the Metadata URL field.
Add the required certificate and a password to the Password Manager.
Set up a default Language and Role for the users with Okta SAML authentication permissions.
Click Save to finish the setup. You can now log out and test your configured SAML login integration.
Open the Configuration settings of your custom app, fill the displayed fields as follows and hit Save to save the configuration:
Audience (EntityID): a unique, custom name to identify the app on the IdP side (in this example we'll be using XOPEROSAML)
ACS (Consumer) URL Validator*:
https://XoperoONEManagementServiceURL/Auth/AssertionConsumerService
ACS (Consumer) URL*:
https://XoperoONEManagementServiceURL/Auth/AssertionConsumerService
Single Logout URL:
https://XoperoONEManagementServiceURL/auth/SAMLLogoutResponse
Click the SSO menu option on the left. Change SAML Signature Algorithm to SHA-256. Copy the Issuer URL value and save it for later— it will be needed for Xopero ONE configuration.
Save all your settings. Open Users settings in the left-hand side menu, select user(s) you want to have permission to use OneLogin for Xopero ONE authentication, then in the window that pops-up, check the Allow user to sign in checkbox and hit Save.
In the Applications tab, use the (+) button to add proper permissions to your custom application.
Login to your XMS web panel, go to Settings (bottom-left corner in the left-hand side menu) and select External Identity Providers.
Click Add new provider button and fill in the details:
Name: your own custom name, i.e., OneLogin
Entity ID: should be the same name you've set in Configuration (Audience (EntityID)) in OneLogin (in this example it's XOPEROSAML)
Next, paste the previously copied Issuer URL in the Metadata URL field.
Upload the previously downloaded OneLogin .pfx certificate file and add a password to it if required.
Set up a default Language and Role for the users with OneLogin SAML authentication permissions.
Click Save to finish the setup. You can now log out and test your configured SAML login integration.
Go to User > Roles and create roles you would like to use (i.e., XONE viewers, XONE admins, etc.). Assign these roles to different users.
Next, in Applications tab, edit the SAML application. Go to Parameters and use the (+) icon to create a new parameter. In Name field enter http://schemas.xmlsoap.org/claims/Group. Check both Flags (Include in SAML assertion and Multi-value parameter) and save your settings.
In Default if no value selected section select User Roles and Semicolon Delimited input (Multi-value output) from the drop-down menu, and save the parameter.
In your Xopero ONE console go to ⚙️ Settings > External Identity Providers and select the IdP you want to edit.
Click the Group mapping button in the bottom left. In Claim type field enter http://schemas.xmlsoap.org/claims/Group, and in Claim value field enter the name of the role, e.g., XONE viewers. Select roles and permissions you want this group to have, then save. Repeat this step for each role/permission you want to create.
“callback”: "https://XoperoONEManagementServiceURL/auth/SAMLLogoutResponse"In the above address, change XoperoONEManagementServiceURL to your unique XMS URL. You can find it in your XMS login URL— it's the first part of the address (i.e., in https://12a345bc-67de-8901-2345-f6gh78901i2j.ada.xopero.com/authorization/login the part highlighted in red is the URL you need to copy).
In the above address, change XoperoONEManagementServiceURL to your unique XMS URL. You can find it in your XMS login URL— it's the first part of the address (i.e., in https://12a345bc-67de-8901-2345-f6gh78901i2j.ada.xopero.com/authorization/login the part highlighted in red is the URL you need to copy).
If the PKCS #12 file is password protected, add this password to the IdP configuration in Xopero ONE web panel.
Enabling IdP login for the root admin account will prevent logging into the system when an external provider is unavailable.


setFilteredAttributeArray("xoperogroup", LoginUser.RoleNames, "XONE.*");
setFilteredAttributeArray("xoperogroup", LoginUser.GroupNames, "XONE.*");
In the above addresses, change XoperoONEManagementServiceURL to your unique XMS URL. You can find it in your XMS login URL— it's the first part of the address (i.e., in https://12a345bc-67de-8901-2345-f6gh78901i2j.ada.xopero.com/authorization/login the part highlighted in red is the URL you need to copy).
In the above addresses, change XoperoONEManagementServiceURL to your unique XMS URL. You can find it in your XMS login URL— it's the first part of the address (i.e., in https://12a345bc-67de-8901-2345-f6gh78901i2j.ada.xopero.com/authorization/login the part highlighted in red is the URL you need to copy).
The Signature Algorithm by default is RSA-SHA256— leave it as is.
If you also want to login to Xopero ONE from the JumpCloud panel, additionally, add your XoperoONEManagementServiceURL in Login URL field.
In the above address, change XoperoONEManagementServiceURL to your unique XMS URL. You can find it in your XMS login URL— it's the first part of the address (i.e., in https://12a345bc-67de-8901-2345-f6gh78901i2j.ada.xopero.com/authorization/login the part highlighted in red is the URL you need to copy).
In the above address, change XoperoONEManagementServiceURL to your unique XMS URL. You can find it in your XMS login URL— it's the first part of the address (i.e., in https://12a345bc-67de-8901-2345-f6gh78901i2j.ada.xopero.com/authorization/login the part highlighted in red is the URL you need to copy).
In the above address, change XoperoONEManagementServiceURL to your unique XMS URL. You can find it in your XMS login URL— it's the first part of the address (i.e., in https://12a345bc-67de-8901-2345-f6gh78901i2j.ada.xopero.com/authorization/login the part highlighted in red is the URL you need to copy).
In the above address, change XoperoONEManagementServiceURL to your unique XMS URL. You can find it in your XMS login URL— it's the first part of the address (i.e., in https://12a345bc-67de-8901-2345-f6gh78901i2j.ada.xopero.com/authorization/login the part highlighted in red is the URL you need to copy).
To properly configure logout, the private key of the entity that receives the logout request is required. You must upload a file with the .pfx extension to Xopero ONE for OneLogin integration to work properly. Unfortunately, the .pfx file cannot be downloaded directly from OneLogin— you have to use your own certificate or generate it for implementation.
OneLogin offers a form where you can generate a self-signed certificate:
Manually edited login details always override those set by rules or with provisioned attributes.
It's important to understand that with this integration method, you cannot initiate the login from the OneLogin application page. Instead, the login must always be triggered directly from the Xopero ONE side.
You can use group mapping if you have many users whom you want to assign different permissions to.
Each new login to Xopero ONE resets permissions to default— if you change permissions for a user it will only apply during the active session. Relogging the user will make permissions return to default.
Group mapping configuration must be done both in OneLogin and Xopero ONE— start by configuring the OneLogin side.