Virtual appliance
Learn about virtual appliance and its role in Xopero ONE backup.
Overview
A virtual appliance (VA) is a virtual machine image running on a Linux-based system with the Xopero ONE application pre-installed. It can be deployed through the Xopero ONE Management Service (XMS).
The main purpose of a VA is to act as a backup proxy. It enables the use of SCSI HotAdd, one of the fastest transport methods, which allows attaching devices to a running virtual machine. This capability is especially useful for both backup and restore operations.
The default virtual appliance (VA) configuration parameters are:
2 CPUs
4 GB RAM
100 GB disk space
Xopero recommends using a virtual appliance to achieve the highest backup efficiency.
Deployment
Log in to XMS, open the Virtual Machines tab on the left side of the window, and select Deploy virtual appliance at the top.

The system will display the New VMware protection view, where you can select one of the VMware environments available in Xopero ONE.

The selected environment will be responsible for running the Xopero ONE virtual appliance. You can choose the specific host or cluster on which the machine will run, as well as the datastore that will store the virtual machine drives.

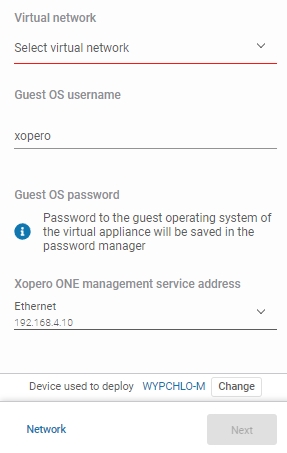
The next section is dedicated to the virtual network, where you can configure the network for your machine, guest OS username and password, as well as the Xopero ONE Management Service (XMS) address, which the application on the virtual appliance will use to establish a connection.
The password for the created virtual appliance on the host can be found in its description (notes). It is recommended to change it to a new, secure password after the machine is created.
Make sure the device used for deployment can communicate with your VMware host or cluster, as it will be responsible for the installation. If communication between the selected device and VMware is unavailable, the process will fail.
Devices with macOS are not supported as deployment devices for virtual appliances in Xopero ONE.

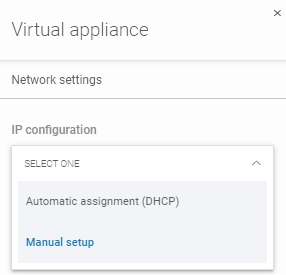
In Network settings you can also configure the IP settings by selecting Automatic assignment (DHCP) or Manual setup from the drop-down list. The first option automatically assigns network settings to the virtual machine adapter through the DHCP protocol, while the second option allows you to configure each parameter manually according to your preferences.

After making your selection and providing all the required details, click the Save button in Network settings, then click Next to install the virtual appliance. The system will display the progress of the deployment process.

Once the process completes successfully, the system will display a success message. You can now use the virtual appliance agent as a worker device in any VMware backup plan.
Last updated

